

How To Run Adb On Windows
Android Debug Bridge (adb) is a versatile command-line tool that lets you lot communicate with a device. The adb control facilitates a multifariousness of device actions, such every bit installing and debugging apps, and it provides access to a Unix vanquish that yous can apply to run a variety of commands on a device. It is a customer-server program that includes three components:
- A customer, which sends commands. The client runs on your development machine. Y'all can invoke a client from a command-line concluding by issuing an adb command.
- A daemon (adbd), which runs commands on a device. The daemon runs as a groundwork process on each device.
- A server, which manages communication between the customer and the daemon. The server runs as a background process on your evolution automobile.
adb is included in the Android SDK Platform-Tools package. You can download this bundle with the SDK Managing director, which installs information technology at android_sdk/platform-tools/. Or if you want the standalone Android SDK Platform-Tools package, you tin download it here.
For information on connecting a device for employ over ADB, including how to use the Connection Assistant to troubleshoot common issues, see Run apps on a hardware device.
How adb works
When you first an adb client, the client first checks whether there is an adb server process already running. If there isn't, it starts the server process. When the server starts, it binds to local TCP port 5037 and listens for commands sent from adb clients—all adb clients use port 5037 to communicate with the adb server.
The server then sets upward connections to all running devices. It locates emulators past scanning odd-numbered ports in the range 5555 to 5585, the range used by the first 16 emulators. Where the server finds an adb daemon (adbd), it sets upwards a connection to that port. Annotation that each emulator uses a pair of sequential ports — an even-numbered port for console connections and an odd-numbered port for adb connections. For example:
Emulator one, panel: 5554
Emulator 1, adb: 5555
Emulator 2, console: 5556
Emulator ii, adb: 5557
and so on...
As shown, the emulator connected to adb on port 5555 is the same as the emulator whose console listens on port 5554.
In one case the server has prepare upwards connections to all devices, y'all can utilize adb commands to admission those devices. Considering the server manages connections to devices and handles commands from multiple adb clients, you can control any device from any client (or from a script).
Enable adb debugging on your device
To employ adb with a device connected over USB, y'all must enable USB debugging in the device system settings, under Developer options. To use adb with a device continued over Wi-Fi, meet Connect to a device over Wi-Fi.
On Android 4.two and higher, the Developer options screen is hidden by default. To brand it visible, go to Settings > Nearly telephone and tap Build number 7 times. Return to the previous screen to notice Developer options at the bottom.
On some devices, the Developer options screen might be located or named differently.
You tin now connect your device with USB. You tin verify that your device is connected by executing adb devices from the android_sdk/platform-tools/ directory. If connected, you'll see the device name listed as a "device."
Note: When you connect a device running Android 4.ii.two or higher, the system shows a dialog request whether to accept an RSA key that allows debugging through this computer. This security mechanism protects user devices because information technology ensures that USB debugging and other adb commands cannot exist executed unless you're able to unlock the device and acknowledge the dialog.
For more information about connecting to a device over USB, read Run Apps on a Hardware Device.
Connect to a device over Wi-Fi (Android 11+)
Annotation: The instructions beneath do not apply to Wear devices running Android 11. Come across the guide to debugging a Wear Bone app for more information.
Android 11 and higher supports deploying and debugging your app wirelessly from your workstation using Android Debug Span (adb). For example, you can deploy your debuggable app to multiple remote devices without physically connecting your device via USB. This eliminates the need to deal with common USB connection issues, such equally commuter installation.
Before yous begin using wireless debugging, you must complete the following steps:
-
Ensure that your workstation and device are connected to the same wireless network.
-
Ensure that your device is running Android xi or higher. For more informaton, see Cheque & update your Android version.
-
Ensure that you have Android Studio Bumblebee. You tin download it here.
-
On your workstation, update to the latest version of the SDK Platform-Tools.
To use wireless debugging, you must pair your device to your workstation using a QR Code or a pairing lawmaking. Your workstation and device must be connected to the same wireless network. To connect to your device, follow these steps:
-
Enable developer options on your device:
-
On your device, find the Build number selection. Y'all can observe this in these locations for the following devices:
Device Setting Google Pixel
Settings > Near telephone > Build number
Samsung Galaxy S8 and after
Settings > Virtually phone > Software data > Build number
LG G6 and later
Settings > About phone > Software info > Build number
HTC U11 and later
Settings > About > Software information > More > Build number or Settings > System > Virtually phone > Software information > More > Build number
OnePlus 5T and later
Settings > Near phone > Build number
-
Tap the Build Number option seven times until y'all see the message
You are now a programmer!This enables developer options on your telephone.
-
-
Enable debugging over Wi-Fi on your device:
-
On your device, discover Developer options. You lot can find this option in these locations for the following devices:
Device Setting Google Pixel, OnePlus 5T and later
Settings > System > Developer options
Samsung Galaxy S8 and afterward, LG G6 and later, HTC U11 and afterwards
Settings > Programmer options
-
In Developer options, scroll down to the Debugging section and plow on Wireless debugging. On the Allow wireless debugging on this network? popup, select Let.
-
-
Open Android Studio and select Pair Devices Using Wi-Fi from the run configurations dropdown carte.

Figure 1. Run configurations dropdown bill of fare.
The Pair devices over Wi-Fi window pops up, as shown below.

Figure 2. Popup window to pair devices using QR code or pairing code
-
On your device, tap on Wireless debugging and pair your device:
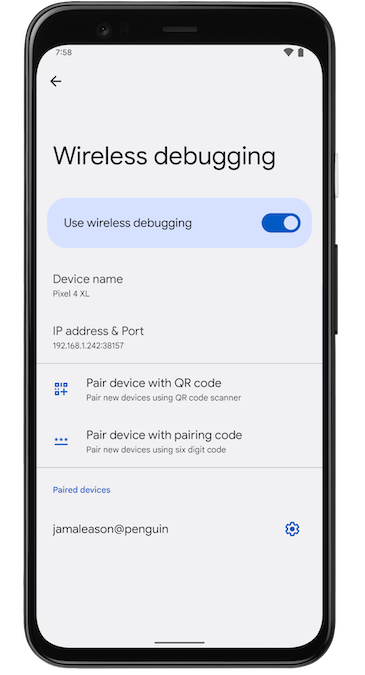
Figure 3. Screenshot of the Wireless debugging setting on a Google Pixel phone.
-
To pair your device with a QR code, select Pair device with QR code and scan the QR code obtained from the Pair devices over Wi-Fi popup above.
-
To pair your device with a pairing code, select Pair device with pairing code from the Pair devices over Wi-Fi popup in a higher place. On your device, select Pair using pairing code and take note of the six digit pin lawmaking. Once your device appears on the Pair devices over Wi-Fi window, you tin select Pair and enter the 6 digit pivot lawmaking shown on your device.
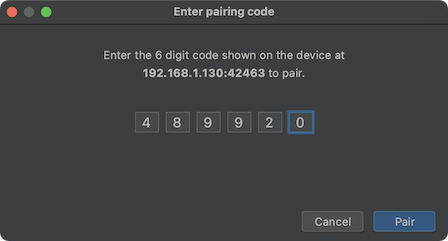
Effigy 4. Example of six digit pin code entry.
-
-
After you are paired, yous tin attempt to deploy your app to your device.
To pair a dissimilar device or to forget this device on your workstation, navigate to Wireless debugging on your device, tap on your workstation name nether Paired devices, and select Forget.
-
If you want to quickly plow on and off wireless debugging, you can employ the Quick settings developer tiles for Wireless debugging, found in Programmer Options > Quick settings developer tiles.
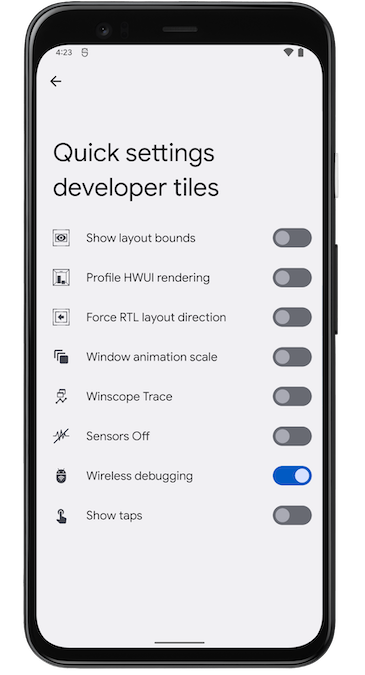
Effigy 5. The Quick settings programmer tiles setting allows you to quickly plow wireless debugging on and off.
Alternatively, to connect to your device via control line without Android Studio, follow these steps:
-
Enable developer options on your device, as described above.
-
Enable Wireless debugging on your device, as described above.
-
On your workstation, open up a terminal window and navigate to
android_sdk/platform-tools. -
Find your IP address, port number, and pairing code by selecting Pair device with pairing code. Take note of the IP address, port number, and pairing code displayed on the device.
-
On your workstation'south terminal, run
adb pair ipaddr:port. Use the IP address and port number from above. -
When prompted, enter the pairing code, as shown below.

Effigy 6. A message indicates that your device has been successfully paired.
-
Resolve wireless connectedness issues
If yous are having issues connecting to your device wirelessly, you lot can try the following troubleshooting steps to resolve the consequence.
Cheque if your workstation and device meet the prerequisites
To meet the prerequisites for wireless debugging, ensure that:
-
Your workstation and device are continued to the same wireless network.
-
Your device is running Android 11 or higher. For more data, see Bank check & update your Android version.
-
You accept Android Studio Bumblebee. Yous can download it here.
-
You have the latest version of the SDK Platform Tools on your workstation.
Check for other known bug
The following is a listing of current known issues with wireless debugging in Android Studio and how to resolve them.
-
Wi-Fi is not connecting: Some Wi-Fi networks, such as corporate Wi-Fi networks, may block p2p connections and not allow you to connect over Wi-Fi.Attempt connecting with a cable or another Wi-Fi network.
-
ADB over Wi-Fi sometimes turns off automatically: This can happen if the device either switches Wi-Fi networks or disconnects from the network.
Connect to a device over Wi-Fi (Android 10 and lower)
Note: The instructions below do not utilise to Wear devices running Android 10 (or lower). See the guide to debugging a Clothing OS app for more data.
adb usually communicates with the device over USB, but you lot tin can as well apply adb over Wi-Fi. To connect a device running Android 10 or lower, there are some initial steps you must do over USB, as described below:
- Connect your Android device and adb host reckoner to a common Wi-Fi network attainable to both. Beware that non all access points are suitable; you might demand to use an access point whose firewall is configured properly to back up adb.
- If y'all are connecting to a Clothing Os device, turn off Bluetooth on the telephone that'due south paired with the device.
- Connect the device to the host reckoner with a USB cable.
- Set the target device to listen for a TCP/IP connection on port 5555.
adb tcpip 5555
- Disconnect the USB cable from the target device.
- Observe the IP address of the Android device. For case, on a Nexus device, you can find the IP address at Settings > About tablet (or About telephone) > Status > IP accost. Or, on a Wear OS device, you can notice the IP address at Settings > Wi-Fi Settings > Advanced > IP address.
- Connect to the device by its IP address.
adb connect device_ip_address:5555
- Confirm that your host computer is connected to the target device:
$ adb devices Listing of devices attached device_ip_address:5555 device
You lot're now good to get!
If the adb connectedness is ever lost:
- Brand sure that your host is nonetheless connected to the same Wi-Fi network your Android device is.
- Reconnect by executing the
adb connectstride again. - Or if that doesn't piece of work, reset your adb host:
adb impale-server
Then get-go over from the beginning.
Query for devices
Before issuing adb commands, it is helpful to know what device instances are connected to the adb server. Yous can generate a list of fastened devices using the devices command.
adb devices -l
In response, adb prints this condition information for each device:
- Serial number: A string created by adb to uniquely place the device by its port number. Hither's an example serial number:
emulator-5554 - State: The connection land of the device tin exist one of the following:
-
offline: The device is not continued to adb or is not responding. -
device: The device is now connected to the adb server. Note that this state does not imply that the Android system is fully booted and operational because the device connects to adb while the system is still booting. Still, afterward boot-upwards, this is the normal operational state of an device. -
no device: There is no device connected.
-
- Description: If you include the
-50option, thedevicescommand tells you what the device is. This information is helpful when you have multiple devices continued and so that you tin can tell them apart.
The post-obit example shows the devices command and its output. There are 3 devices running. The kickoff 2 lines in the listing are emulators, and the third line is a hardware device that is attached to the computer.
$ adb devices List of devices attached emulator-5556 device product:sdk_google_phone_x86_64 model:Android_SDK_built_for_x86_64 device:generic_x86_64 emulator-5554 device product:sdk_google_phone_x86 model:Android_SDK_built_for_x86 device:generic_x86 0a388e93 device usb:1-1 production:razor model:Nexus_7 device:flo
Emulator non listed
The adb devices command has a corner-case command sequence that causes running emulator(southward) to not show up in the adb devices output even though the emulator(s) are visible on your desktop. This happens when all of the following conditions are true:
- The adb server is not running, and
- You apply the
emulatorcommand with the-portor-portspick with an odd-numbered port value between 5554 and 5584, and - The odd-numbered port yous chose is non busy so the port connection tin can be made at the specified port number, or if it is busy, the emulator switches to another port that meets the requirements in ii, and
- You lot showtime the adb server after you get-go the emulator.
One mode to avert this situation is to permit the emulator choose its own ports, and don't run more than sixteen emulators at once. Another way is to always starting time the adb server before you use the emulator command, as explained in the post-obit examples.
Example ane: In the following command sequence, the adb devices command starts the adb server, but the listing of devices does not announced.
Stop the adb server and enter the following commands in the social club shown. For the avd name, provide a valid avd name from your arrangement. To go a list of avd names, blazon emulator -list-avds. The emulator command is in the android_sdk/tools directory.
$ adb impale-server $ emulator -avd Nexus_6_API_25 -port 5555 $ adb devices List of devices fastened * daemon not running. starting it now on port 5037 * * daemon started successfully *
Case 2: In the following command sequence, adb devices displays the list of devices considering the adb server was started commencement.
To see the emulator in the adb devices output, stop the adb server, and and then first it again after using the emulator command and before using the adb devices command, as follows:
$ adb kill-server $ emulator -avd Nexus_6_API_25 -port 5557 $ adb start-server $ adb devices List of devices fastened emulator-5557 device
For more data about emulator control-line options, come across Using Control Line Parameters.
Send commands to a specific device
If multiple devices are running, you must specify the target device when you consequence the adb command. To specify the target, utilize the devices control to get the serial number of the target. One time y'all have the serial number, use the -s selection with the adb commands to specify the serial number. If you're going to issue a lot of adb commands, you can set the $ANDROID_SERIAL environment variable to incorporate the serial number instead. If y'all use both -s and $ANDROID_SERIAL, -due south overrides $ANDROID_SERIAL.
In the post-obit instance, the list of attached devices is obtained, and and then the series number of ane of the devices is used to install the helloWorld.apk on that device.
$ adb devices List of devices attached emulator-5554 device emulator-5555 device $ adb -south emulator-5555 install helloWorld.apk
Note: If you issue a command without specifying a target device when multiple devices are available, adb generates an error.
If you accept multiple devices available, but only ane is an emulator, use the -e option to send commands to the emulator. Likewise, if there are multiple devices but only ane hardware device attached, use the -d selection to send commands to the hardware device.
Install an app
You tin use adb to install an APK on an emulator or connected device with the install command:
adb install path_to_apk
You must utilize the -t option with the install control when you install a test APK. For more information, see -t.
For more information about how to create an APK file that you can install on an emulator/device instance, run into Build and Run Your App.
Annotation that, if you are using Android Studio, you do not need to apply adb directly to install your app on the emulator/device. Instead, Android Studio handles the packaging and installation of the app for you lot.
Prepare port forwarding
You can use the forward command to set arbitrary port forwarding, which forwards requests on a specific host port to a different port on a device. The following example sets up forwarding of host port 6100 to device port 7100:
adb forward tcp:6100 tcp:7100
The following instance sets up forwarding of host port 6100 to local:logd:
adb forward tcp:6100 local:logd
Copy files to/from a device
Use the pull and push commands to copy files to and from an device. Dissimilar the install control, which merely copies an APK file to a specific location, the pull and push button commands let you copy capricious directories and files to any location in a device.
To copy a file or directory and its sub-directories from the device, do the following:
adb pull remote local
To copy a file or directory and its sub-directories to the device, exercise the post-obit:
adb push button local remote
Replace local and remote with the paths to the target files/directory on your development motorcar (local) and on the device (remote). For example:
adb push button foo.txt /sdcard/foo.txt
Stop the adb server
In some cases, you might need to end the adb server procedure and and so restart it to resolve the problem (e.g., if adb does not respond to a command).
To stop the adb server, use the adb impale-server command. Y'all can then restart the server by issuing any other adb command.
Issuing adb commands
You can issue adb commands from a command line on your development machine or from a script. The usage is:
adb [-d | -e | -s serial_number] command
If there'due south only one emulator running or only one device connected, the adb command is sent to that device past default. If multiple emulators are running and/or multiple devices are fastened, you need to apply the -d, -e, or -s selection to specify the target device to which the command should be directed.
You lot can see a detailed list of all supported adb commands using the following command:
adb --help
Issue beat commands
You can employ the vanquish command to issue device commands through adb, or to offset an interactive shell. To result a unmarried control apply the shell command like this:
adb [-d |-due east | -s serial_number] shell shell_command
To commencement an interactive shell on a device employ the shell command like this:
adb [-d | -eastward | -s serial_number] shell
To get out an interactive trounce, press Control + D or type go out.
Annotation: With Android Platform-Tools 23 and higher, adb handles arguments the same manner that the ssh(1) control does. This change has stock-still a lot of problems with command injection and makes it possible to at present safely execute commands that incorporate vanquish metacharacters, such as adb install Let\'sGo.apk. But, this change means that the interpretation of any command that contains shell metacharacters has as well inverse. For example, the adb beat setprop foo 'a b' command is at present an error because the single quotes (') are swallowed by the local shell, and the device sees adb shell setprop foo a b. To make the control work, quote twice, once for the local shell and once for the remote beat, the same every bit you do with ssh(ane). For example, adb crush setprop foo "'a b'".
Android provides most of the usual Unix command-line tools. For a list of available tools, use the post-obit command:
adb shell ls /arrangement/bin
Help is bachelor for most of the commands via the --help argument. Many of the shell commands are provided by toybox. General help applicable to all toybox commands is available via toybox --help.
Come across likewise Logcat Command-Line Tool which is useful for monitoring the system log.
Phone call activity manager (am)
Within an adb shell, you lot can issue commands with the activity manager (am) tool to perform various arrangement actions, such as starting time an activity, force-end a process, broadcast an intent, modify the device screen properties, and more than. While in a crush, the syntax is:
am command
Yous can as well issue an activity manager control directly from adb without entering a remote shell. For example:
adb trounce am start -a android.intent.action.VIEW
Table 2. Available activity manager commands
| Control | Description |
|---|---|
commencement [options] intent | Start an Action specified by intent . See the Specification for intent arguments. Options are:
|
startservice [options] intent | Start the Service specified past intent . Run across the Specification for intent arguments. Options are:
|
force-stop package | Force stop everything associated with package (the app's packet name). |
impale [options] package | Kill all processes associated with parcel (the app's package proper name). This control kills just processes that are prophylactic to kill and that volition not impact the user feel. Options are:
|
kill-all | Kill all background processes. |
broadcast [options] intent | Upshot a broadcast intent. Encounter the Specification for intent arguments. Options are:
|
instrument [options] component | Start monitoring with an Instrumentation case. Typically the target component is the form test_package/runner_class . Options are:
|
profile start process file | Start profiler on procedure , write results to file . |
profile stop process | Stop profiler on process . |
dumpheap [options] process file | Dump the heap of procedure , write to file . Options are:
|
set-debug-app [options] package | Set app package to debug. Options are:
|
clear-debug-app | Clear the packet previous set for debugging with set-debug-app. |
monitor [options] | Kickoff monitoring for crashes or ANRs. Options are:
|
screen-compat {on | off} package | Command screen compatibility style of package . |
display-size [reset | widthxtiptop] | Override device brandish size. This command is helpful for testing your app across unlike screen sizes by mimicking a small-scale screen resolution using a device with a large screen, and vice versa. Example: |
brandish-density dpi | Override device display density. This command is helpful for testing your app across different screen densities on high-density screen environment using a depression density screen, and vice versa. Example: |
to-uri intent | Print the given intent specification as a URI. Meet the Specification for intent arguments. |
to-intent-uri intent | Print the given intent specification every bit an intent: URI. See the Specification for intent arguments. |
Specification for intent arguments
For activity manager commands that accept an intent argument, you can specify the intent with the following options:
Call packet manager (pm)
Within an adb vanquish, yous tin issue commands with the packet managing director (pm) tool to perform actions and queries on app packages installed on the device. While in a shell, the syntax is:
pm control
You lot tin can also issue a parcel manager command directly from adb without entering a remote shell. For case:
adb shell pm uninstall com.case.MyApp Table iii. Bachelor packet director commands.
| Command | Description |
|---|---|
list packages [options] filter | Prints all packages, optionally only those whose package proper name contains the text in filter . Options:
|
list permission-groups | Prints all known permission groups. |
list permissions [options] group | Prints all known permissions, optionally simply those in group . Options:
|
list instrumentation [options] | List all exam packages. Options:
|
listing features | Prints all features of the system. |
list libraries | Prints all the libraries supported by the current device. |
list users | Prints all users on the system. |
path package | Print the path to the APK of the given package . |
install [options] path | Installs a packet (specified by path ) to the system. Options:
|
uninstall [options] packet | Removes a package from the organisation. Options:
|
articulate bundle | Deletes all data associated with a package. |
enable package_or_component | Enable the given bundle or component (written every bit "packet/form"). |
disable package_or_component | Disable the given package or component (written equally "package/class"). |
disable-user [options] package_or_component | Options:
|
grant package_name permission | Grant a permission to an app. On devices running Android six.0 (API level 23) and college, the permission can be whatever permission declared in the app manifest. On devices running Android 5.one (API level 22) and lower, must exist an optional permission divers past the app. |
revoke package_name permission | Revoke a permission from an app. On devices running Android half dozen.0 (API level 23) and higher, the permission tin can be any permission declared in the app manifest. On devices running Android 5.1 (API level 22) and lower, must exist an optional permission defined past the app. |
set-install-location location | Changes the default install location. Location values:
Annotation: This is but intended for debugging; using this can crusade apps to break and other undesireable behavior. |
get-install-location | Returns the current install location. Return values:
|
gear up-permission-enforced permission [true | fake] | Specifies whether the given permission should be enforced. |
trim-caches desired_free_space | Trim cache files to accomplish the given free space. |
create-user user_name | Create a new user with the given user_name , printing the new user identifier of the user. |
remove-user user_id | Remove the user with the given user_id , deleting all data associated with that user |
go-max-users | Prints the maximum number of users supported by the device. |
Call device policy director (dpm)
To aid you develop and test your device management (or other enterprise) apps, you lot tin can issue commands to the device policy manager (dpm) tool. Employ the tool to control the active admin app or modify a policy'south condition information on the device. While in a vanquish, the syntax is:
dpm command
You tin can besides outcome a device policy manager control straight from adb without inbound a remote beat out:
adb shell dpm control
Tabular array 4. Available device policy manager commands
| Command | Description |
|---|---|
set-active-admin [options] component | Sets component as active admin. Options are:
|
set-contour-owner [options] component | Sets component as active admin and its parcel as profile owner for an existing user. Options are:
|
set-device-possessor [options] component | Sets component every bit active admin and its package as device possessor. Options are:
|
remove-active-admin [options] component | Disables an active admin. The app must declare android:testOnly in the manifest. This command besides removes device and contour owners. Options are:
|
clear-freeze-period-record | Clears the device's record of previously-set freeze periods for system OTA updates. This is useful to avert the device'south scheduling restrictions when developing apps that manage freeze-periods. See Manage system updates. Supported on devices running Android 9.0 (API level 28) and higher. |
force-network-logs | Forces the organisation to make any existing network logs ready for retrieval past a DPC. If in that location are connectedness or DNS logs available, the DPC receives the onNetworkLogsAvailable() callback. See Network activeness logging. This command is rate-limited. Supported on devices running Android 9.0 (API level 28) and higher. |
forcefulness-security-logs | Forces the system to make any existing security logs available to the DPC. If there are logs available, the DPC receives the onSecurityLogsAvailable() callback. Run into Log enterprise device activity. This command is rate-limited. Supported on devices running Android nine.0 (API level 28) and higher. |
Take a screenshot
The screencap control is a beat utility for taking a screenshot of a device display. While in a crush, the syntax is:
screencap filename
To use the screencap from the command line, type the post-obit:
adb vanquish screencap /sdcard/screen.png
Here's an example screenshot session, using the adb shell to capture the screenshot and the pull command to download the file from the device:
$ adb beat trounce@ $ screencap /sdcard/screen.png shell@ $ exit $ adb pull /sdcard/screen.png
Record a video
The screenrecord command is a shell utility for recording the display of devices running Android 4.four (API level xix) and higher. The utility records screen action to an MPEG-iv file. Y'all can use this file to create promotional or grooming videos or for debugging and testing.
In a crush, use the post-obit syntax:
screenrecord [options] filename
To use screenrecord from the control line, type the following:
adb shell screenrecord /sdcard/demo.mp4
Stop the screen recording past pressing Control + C (Command + C on Mac); otherwise, the recording stops automatically at three minutes or the fourth dimension limit fix by --time-limit.
To begin recording your device screen, run the screenrecord command to tape the video. Then, run the pull control to download the video from the device to the host reckoner. Hither's an example recording session:
$ adb shell shell@ $ screenrecord --verbose /sdcard/demo.mp4 (press Command + C to stop) crush@ $ exit $ adb pull /sdcard/demo.mp4
The screenrecord utility tin record at any supported resolution and bit rate y'all request, while retaining the aspect ratio of the device brandish. The utility records at the native display resolution and orientation by default, with a maximum length of three minutes.
Limitations of the screenrecord utility:
- Sound is non recorded with the video file.
- Video recording is not available for devices running Wearable OS.
- Some devices might non be able to record at their native display resolution. If you come across bug with screen recording, endeavour using a lower screen resolution.
- Rotation of the screen during recording is not supported. If the screen does rotate during recording, some of the screen is cut off in the recording.
Table v. screenrecord options
| Options | Description |
|---|---|
--help | Displays command syntax and options |
--size widthtensuperlative | Sets the video size: 1280x720. The default value is the device's native display resolution (if supported), 1280x720 if not. For best results, use a size supported by your device's Advanced Video Coding (AVC) encoder. |
--chip-rate rate | Sets the video scrap charge per unit for the video, in megabits per second. The default value is 4Mbps. Y'all can increment the fleck charge per unit to better video quality, but doing so results in larger movie files. The following example sets the recording bit rate to 6Mbps: screenrecord --bit-rate 6000000 /sdcard/demo.mp4 |
--time-limit time | Sets the maximum recording time, in seconds. The default and maximum value is 180 (3 minutes). |
--rotate | Rotates the output 90 degrees. This feature is experimental. |
--verbose | Displays log data on the command-line screen. If you do not set this option, the utility does not display any data while running. |
Read ART profiles for apps
Starting in Android 7.0 (API level 24) the Android Runtime (ART) collects execution profiles for installed apps, which are used to optimize app functioning. You might desire to examine the collected profiles to understand which methods are adamant to exist frequently executed and which classes are used during app startup.
To produce a text class of the profile data, employ the control:
adb crush cmd parcel dump-profiles parcel
To recollect the file produced, use:
adb pull /data/misc/profman/package.txt
Reset test devices
If you test your app across multiple test devices, information technology may be useful to reset your device between tests, for example, to remove user data and reset the test environs. You can perform a manufactory reset of a examination device running Android x (API level 29) or college using the testharness adb crush command, as shown beneath.
adb beat out cmd testharness enable
When restoring the device using testharness, the device automatically backs upward the RSA key that allows debugging through the electric current workstation in a persistent location. That is, afterwards the device is reset, the workstation tin can keep to debug and consequence adb commands to the device without manually registering a new fundamental.
Additionally, to help make it easier and more secure to keep testing your app, using the testharness to restore a device also changes the following device settings:
- The device sets upwardly certain system settings so that initial device setup wizards do not announced. That is, the device enters a state from which y'all can quickly install, debug, and examination your app.
- Settings:
- Disables lock screen
- Disables emergency alerts
- Disables car-sync for accounts
- Disables automatic organisation updates
- Other:
- Disables preinstalled security apps
If yous app needs to detect and conform to the default settings of the testharness control, y'all tin use the ActivityManager.isRunningInUserTestHarness().
sqlite
sqlite3 starts the sqlite command-line program for examining sqlite databases. It includes commands such as .dump to print the contents of a table, and .schema to print the SQL CREATE statement for an existing table. You can also execute SQLite commands from the control line, as shown below.
$ adb -due south emulator-5554 beat out $ sqlite3 /information/information/com.example.app/databases/rssitems.db SQLite version 3.3.12 Enter ".help" for instructions
For more information, see the sqlite3 control line documentation.
Source: https://developer.android.com/studio/command-line/adb
Posted by: cobbentoo1954.blogspot.com
0 Response to "How To Run Adb On Windows"
Post a Comment